
Let’s Enjoy Ohagi like Sanemi Shinazugawa! - Demon Slayer: Kimetsu no Yaiba Recipe


If you have been paying attention to the Demon Slayer: Kimetsu no Yaiba manga, you might have seen Sanemi Shinazugawa admit that he loves to cook and eat ohagi. His pride may not let him talk about it much, but we are not held back by such stipulations! If you haven’t been in Japan during the autumn and spring equinox, though, you may have not encountered ohagi before. So if you want to know why Sanemi loves this traditional treat so much, keep reading - we are going to teach you what it is, and how to make it yourself today! As a warning, you’ll definitely need to pick up a few things from your local Asian supermarket, and this will be a lot easier if you have a rice cooker, too.
[ad_top2 class="mt40"]What is Ohagi?
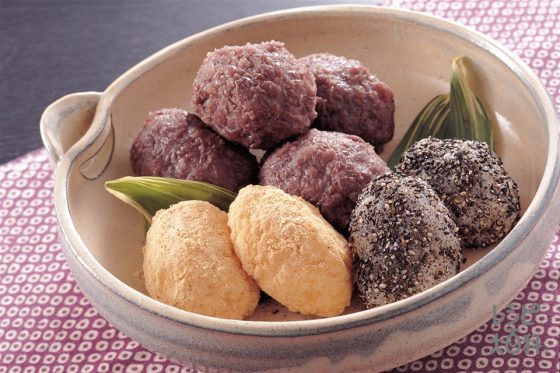
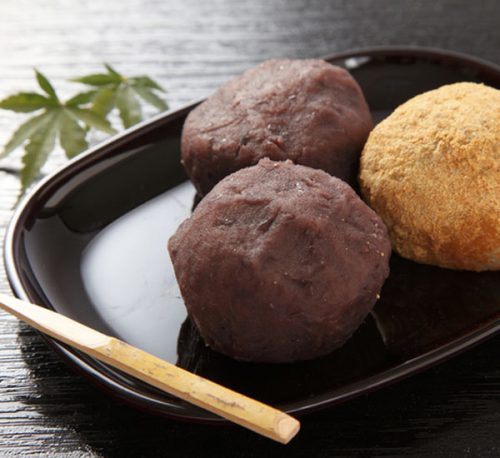
Ohagi is a really traditional Japanese food made with glutinous rice and red bean paste, and can be coated in black sesame powder, kinako (soybean flour) powder, or even more red bean paste. In Japan, it’s eaten specifically during the autumn equinox season (a similar food called botamochi is eaten in the spring). Its also offered to one’s ancestors in special ceremonies. So why does Sanemi like it so much? While its never expressly stated in Demon Slayer: Kimetsu no Yaiba, we certainly have a guess. Red beans are thought to help dispel evil in Japanese lore, so maybe Sanemi likes to eat them to help with his powers in the Demon Slayer Corps! Ohagi is also a very old Japanese food, and since Demon Slayer’s setting has a historical Japanese vibe, the ohagi offers continuity in the time period. So now that you know what ohagi is, and probably why Sanemi likes them so much (other than how delicious they are, of course), let’s get on to how you can make them yourself!
Ohagi (vegan friendly!)
Makes 12 pieces
What you need:
short-grain uncooked rice
1/2 cup
glutinous rice (“mochigome”)
1 cup
water
1 1/2 cups
salt
1/4 tsp
red bean paste (“anko”)
1/2 lb
black sesame seeds
3 tbsp
soybean flour (“kinako”)
3 tbsp
sugar
2 tbsp
How to make:
-
1
First, combine the short-grain rice and glutinous rice together in a bowl and rinse it a few times while stirring with your finger to remove any excess starch. When the water comes away clean, the rice is ready. -
2
Put the rice in your rice cooker with the water and let it soak in there for about twenty minutes. After the rice has soaked, you can cook it on the rice cooker’s normal setting. -
3
Next, you can make the ohagi toppings while the rice is soaking and cooking. Take your black sesame seeds and grind them into a powder (you can use a mortar and pestle if you have them!). Mix in 1 tbsp of sugar and leave to the side in a bowl. Next, mix the other 1 tbsp of sugar with the soybean flour and put it in another bowl. Luckily you don’t need to do anything to the red bean paste! -
4
When the rice is almost ready, make saltwater by adding the salt to 1/2 cup of water, and soak your wooden rolling pin or pestle in this saltwater. This will help the sticky glutinous rice not stick to your instrument when you are trying to pound it. Don’t dump the water out because you will need it several times. -
5
Start pounding the rice while it is still hot in the rice cooker bowl with a pestle or a rolling pin. If the rice starts to stick too much to it, soak it in the saltwater again. Continue to pound the rice until it is mostly mashed, but with a few rice grains still visible. -
6
With hands soaked in saltwater, take a small amount of the pounded rice in your hand and flatten it into a circle in your palm. Then, scoop a spoonful of red bean paste and put it in the centre of the rice patty. Finally, close the rice around the red bean paste so its in the middle. Do this until you do not have any more pounded rice (about 12 pieces). -
7
You can coat the balls with the soybean flour mix or black sesame mix by rolling them carefully in the bowl (use chopsticks if you want to keep your hands clean). You can also coat them in extra red bean paste by spreading it on plastic wrap, putting your ohagi in the middle, and wrapping the plastic wrap around it and pressing gently. -
8
Enjoy eating your ohagi - and embrace the power of the red beans!
Yum!
Final Thought

While you are probably not out there slaying demons yourself and needing the added boost of red beans, and also unlikely to be offering ohagi to your ancestors, we hope you can enjoy making some ohagi all the same! These little sweets are filling and delicious, and taste distinctly “Japanese.” We highly recommend making a batch of ohagi for the next time you’re watching or reading Demon Slayer: Kimetsu no Yaiba - and letting yourself become one with Sanemi as you ingest the power of the red beans! If you like it, try having a cup of green tea on the side, too. Have you tried out our ohagi recipe yet? What did you think of it? Did you know what ohagi were the first time you heard Sanemi mention them in Demon Slayer: Kimetsu no Yaiba? Are there any other foods from anime that you would love a similar article and recipe about? Drop us a comment below!
[author author_id="048" author="" translator_id=""] [ad_bottom class="mt40"]
[recommendedPost post_id='295302' url='' title='' img='' class='' widget_title=''] [recommendedPost post_id='294268' url='' title='' img='' class='' widget_title=''] [recommendedPost post_id='292932' url='' title='' img='' class='' widget_title='']
About Anime News


![Top 10 Masochist Hentai Anime [Best Recommendations]](https://lh3.googleusercontent.com/blogger_img_proxy/AEn0k_teKzJGm2iHCclBluN4fk4FfOkzbOTtmga_Oe-WPEcXtco9MYmM-2Hm6vmiT-noBoGlmxaa63tdhJe8LUlPkUdDjMTi-UhvHR7xeGknqe_RX9-Z8HoeC3YMGamnykCkaXLNNRGyfAtlKCZdvHAp_zdnkZCBdFTuekV_PPxxObXDjlENZQ3gSwEY4CTlVKI=w72-h72-p-k-no-nu)
No comments